Friday, December 30, 2011

Holidays with the Hoodlums


It's been an extremely busy Holiday break for me.I've gotten a lot of things done but I'm not quite at the place where I can show all of it yet. I have gotten 2 projects just about finished up and ready for my portfolio out of the original seven that I hoped to get through. 

I'm just about done with 3 more, although I've put down my robot with all the gears and I won't be touching it until I'm done with the other two. I spent far too much time on it this week trying to get the materials working right and the lighting/rendering done. I haven't been too successful and I have decided to just walk away for now before I get too frustrated with it. Hopefully I can pick it back up refreshed and ready to try again in a little bit.

I'm hoping to finish up King today, even though there is so much more I want to do with him. My problem is that I am such a perfectionist that I have a hard time ever calling something "done." It's a blessing and a curse. But I have decided that for now I need to put my nit-picking tendencies aside and call it.  I finished up his textures yesterday by fixing up his pants and adding dirt and stains to his shoes, scarf, and hat. Ideally I'd like to add more to his jacket and some dirt to his pants, but I think that if I kept trying for my ideal vision of him I'd never put the project down.


I love the way his shoes turned out, although you don't really get to see them in the full image.

My hope for today is to get his renders redone with the new textures and a turn table going. I have a second computer set up to handle my renders so I can hopefully finish up the textures for my piano, but I may have to do some of my class assignments for school today instead. Either way I'll be continuing to get stuff done.

Sunday, December 25, 2011

Holiday Post

Well there's only 42 minutes of Christmas left, but since it still technically IS Christmas I figured I'd just make this a holiday post or something.

MERRY CHRISTMAS EVERYONE!

I'm going to do a quick post of a drawing I just finished. It's something I did for fun since I don't get to do too much 2D these days. The first time I've used a pen to draw in about a year too.  Took me roughly 2 hours to do.

Again, just something I made up for fun so I hope you enjoy it.


(scanner is on the fritz so I had to take a photo, I'll try to upload a better quality image when I can)

Friday, December 23, 2011

I Heart Textures

I'm back again, and so soon too! I couldn't stay away really. I kept telling myself I didn't have enough to post yet, but that's really not true at all. I've been working almost all week on my portfolio pieces and I gotta say I really do love 3D.  It's hard for me sometimes because I struggle with it much more than I do with 2D. Most of which can be attributed to inexperience, but I also know that I sometimes struggle to grasp the more technical side of the 3D world. I know I can handle the technical aspects, but I do tend to have to put more time and effort into learning and understanding them. But once I understand something it becomes second nature and the more this happens the more confident I become and the more I enjoy and look forward to working.

Anyways, enough of all that! Since I'm saving all my rendering until next week, I decided to move on from my robot/oracle, and start working on the next thing. While I really want to keep working on King, I realized it would be better to get my smaller projects out of the way first. It would be bad if I spent my entire Christmas break working on him and ended up with only one thing for my portfolio. So some debate over what to work on I decided it was high time I revisited my piano.


I originally modeled this piano for my  3D Enivornmental Design class. It was for a group project in which we had to recreate an entire room. The hardest part was that all the models also had to be to scale, which was something I had never had to do before. So this piano is based on an actual physical piano that I got to sit there and measure with a ruler and a tape measure.

The original version of the model is high poly and the textures were done procedurely (this was before I really knew much about procedural shaders) in Maya.

 Here's a picture of what the actual piano looked like.


Since modeling it I have reduced it to a low poly version, which is what I have been working on this week. I started by first re-laying the UVs so that they would take up the majority of the UV space.


And currently I am working on retexturing the whole thing. I have been using a mixture of photographs as well as hand drawn elements to not only give the piano my own unique touch but also to help enhance it's realism. My favorite thing about texturing is that it really allows me to draw on my fine art expertise. I absolutely love drawing and creating my own textures by hand.


Right now I am focusing on adding in damgage and the kind of details that will give the piano a worn out look. I am not trying to copy the appearance of the original piano that I photographed and measured since that was only a requirement when I was using it for my class assignment. I'm maybe half way there with the textures. It's taking me longer since I am working at home and don't have access to a wacom cintiq. As much as I desperately want a cintiq they're too expensive for me to be able to afford on my own. It's unfortunate because I know that I could do everything in about a third that amount of time if I had one.

Anyways, even though I'm not done, here's a quick render of what the textures look like on the model so far. I'm only focusing on the color at the moment so ignore things like reflection and specularity as I have yet to get to them. Also remember this is the low poly version of the model so it doesn't look exactly like the one above.


Wednesday, December 21, 2011

Heavy Metal

It's holiday break for RIT which means I'm nice and comfy back at home in Maryland. Of course, just because I'm 6 hours away from college doesn't mean I'm 6 hours away from work.

This Christmas break I've been diligently working on my portfolio. I have about 8 projects I need to fix up and make shine before they are ready to be called "portfolio pieces." Overall, most of them are about 85-90% of the way there, they just need that last bit of polish before they are good to go. One or two of them are already in my portfolio but need turn tables or new renders and so on.

I spent a good amount of time last year putting my portfolio together for the Game Developer's Conference. I got a ton of great feedback from the people there, but haven't had a chance until now to actually start putting it to use and making changes. Plus I have a lot of new and far better work now (it has been a whole year afterall) that I want to add in.

I took the first  few days of my holiday break to relax so I don't have too much(at least in comparison to how much I have to do overall) done yet.

Today I just finished UVing and texturing a piece (left) I did earlier this school year for my High Poly Class.  Since it was a modeling class, we had to focus on modeling and nothing else and weren't allowed to texture any of our work except for the final assignment.

I started out laying out some of the UVs, not everything needed them, but some of the larger pieces
needed it. Once I got the UVs, I started making some metalic textures for it procedurely.

I thought I had done pretty well at first, because when I rendered close ups of the different materials it looked pretty good, but then I rendered the whole thing and quickly        
                                                                 changed my mind.

I'll be honest... it looked pretty bad (to put it lightly), haha. The colors were all wrong and the materials barely looked like metal. It was pretty clear that I had a lot more work to do if I wanted to make the materials procedurely.

I've had a lot of experience making my materials by hand in photo shop and painting the different maps and so on, but I have yet to fully master procedural shaders. I could've gone my usual route and done it all by hand, but that requires the UVs for everything to be laid out. And since this was a model for a high poly class my geometry was such that
UVing while not impossible, would be difficult.

I took a break from working and came back refreshed and ready to work. I managed to use the shaders I had in the image above, as bad as they were, as a starting point and kept building from there. For the most part I had things right, I just needed to tweak the values and some of the colors.  And once I got the hang of it with one of the materials I was able to easily adjust the others. Even though it took me longer than I planned, I still saved myself a few hours of work had I tried to UV everything and do it the way I usually like to.

After some playing around I ended up with this:

Overall it was a major improvement. Looking at this I honestly don't know how I got what I had the first time I tried. Maybe I just really needed to take that break and get away so I could refresh my thought process. I'm very happy with how the shaders turned out, especially since I haven't had too much practice with doing shaders entirely in Maya. I tried to make each of the metals look and feel slightly different so they wouldn't all look exactly the same.

Now that I have it textured the only thing left is to re-light and re-render it and I'll be all done fixing this project up for my portfolio!

Friday, December 16, 2011

Tea Time: Update

So I was looking over my blog post from yesterday and I realized that I uploaded the wrong image of my still life. The difference is not that big, but I spent a good amount of time working on the lemon slice (I'm still not done, but that's not the point) and I wanted to be able to show the latest progress on it.

I also wanted to bring up that currently I have the Mia Material X applied to my spoon and silver tea pot, and that I'm planning on replacing that with my own shader, and possibly reflection map (I probably won't have time for this but if I do I would like to do it), in the future.


Wednesday, December 14, 2011

Tea Time with the Hoodlums

My latest project for 3D Shading is to create/recreate a still life. As a fine artist, still lifes are somewhat of a passion of mine, especially when it comes to painting, so I was very excited when we got the assignment. I first began trying to recreate a still life created by Will Kemp, which can be found here. I was particularly drawn to his painting because of it's simple, yet compelling composition. As much as I wanted to do an overly grand and complex set up for this project, I managed to convince my self to keep the scope small so that I would be able to produce a higher quality piece overall.


Although I began copying the set up of Kemp's painting, it wasn't very long before I ended up changing the composition around altogether and even adding in my own objects. As a result, the only remaining similarity between my composition and Kemp's is the tea cup with lemon slice and spoon. However, I decided to go with a more dramatic downward angle.

I am far from done. I have a lot of work to do with the shaders and even have some things I still want to add into the scene. The texture for the tea cup is my own creation which I hand-drew in photoshop. I am very happy with it as it is my first time entirely hand drawing a tileable texture. Here's a small snippet of the whole thing.


Now that that's done and over with, I am super excited to share an update on my character, King! When I last posted about him, I mentioned that I had some issues and was forced to turn him in without getting to do everything I wanted with the textures. I had always been planning on returning to him and finishing him up, but it's extremely difficult to find time for extra projects when I've already got my hands full with class assignments. I finally found some time today, and got a good amount of work done, especially on his pants.

I pretty much finished his jeans,  I just need to touch up the bottom where it folds and lower the amount of fade near the bottom because it looks weird having a straight stripe. I gave him some adorable back pockets too, which you can't see in this shot, but I assure you they are there.

I spent a good portion of my time on the jeans, as I originally wanted to hand paint them entirely. But I just couldn't get the fading to look right so I ended up layering in actual photos of faded jeans and then altering them with my own brush strokes and so on.

Aside from the pants, I added a patch to the arm of his jacket and started layering some dirt onto the jacket as well. So far I'm very happy with the direction things are going, and can't wait to keep working on it!

Friday, December 9, 2011

Working Together


One of the things I am doing this quarter is assisting several of the seniors in my major with their thesis projects. I’m really excited about this because I really enjoy working with other people, especially when it has to do with 3D. It’s really great to be able to bounce ideas off other people and work together to solve problems. I’ve found that you learn more when you work with other people and you develop a lot of strong bonds with the people you get to work with.
One of the people I’ll be working with this quarter is my really good friend Yuya Takeda (AKA Skybase). I’m especially excited about it because he’s an extremely talented and creative individual and whenever I work with him I get to learn so much.
I’ll be modeling two scenes for his project, The Door To Tomorrow. A hospital room and the hallway in the hospital that the room is in. He’s going to be painting over the renders in the end, so we’re not really concerned with small details, or having perfectly smooth edges. For the most part things are going to end up being pretty low poly, which will also help on saving render time. On their own, the scenes probably won’t look like too much, but after Yuya paints over them and runs his different filters, it will look absolutely stunning.
You can get a good idea of the process he’ll be going through to paint over and change the render of my scene by visiting his site here.

I’m already almost done modeling the hospital room which is great considering I’ve only put 4 or 5 hours into it, including the UVs of the room itself. I have to add some wheels to the bed itself as well as model a lamp that plugs into the strip above the bed.

I just did a quick AO render of the room so far because it’s easy and let’s face it, AO passes look so pretty!

The last thing I have to share is a concept drawing I started for a character idea me and a few others came up with. I didn’t have a lot of time to work on him, but I think he looks pretty good for only 2 and a half hours of work.  I’d like to think I could finish him if I had another 2 or 3 hours, so hopefully I’ll be able to share a finished version soon.


Tuesday, December 6, 2011

Red Pears Are A Thing!

After only 1 week into the new quarter I am already up to my head in homework! It looks like it will be an extremely busy quarter for me this winter. Which is good news for you all because that means I will have lots of new work to share! That is, assuming I can still manage to find time to share it. At the very least I will do my best to post the images. I might not always be able to write as much as I usually do, but this is a blog for my artwork so hopefully that won't be a huge issue.

Speaking of images, I just finished my first two mini assignments for my new 3D Shading Class.They aren't anything too special since they are essentially mini assignments that were based off of a tutorial. I didn't follow the tutorials entirely though because I like to do my own things (I live on the edge).

Note: The focus of the class is on shading procedurally so we're supposed keep the modeling to minimum. So just keep that in mind when looking at the work from it.

For the flag, the tutorial originally had a US Flag, but I'm half Lebanese so I wanted to make a Lebanese Flag instead. The tutorial also originally had us using the marble texture in Maya to make the rips and tears, but it looked awful even in the tutorial so I made my own transparency maps for it in Photoshop. I also did the dirt map on my own in photo shop even though the tutorial didn't go over it. The purpose of the tutorial was more about doing things procedurally, which I did with the exception of making a vector for the tree, the transparency map for the tears, and the dirt maps. Everything else I did in Maya. Overall it looks pretty flat because we were supposed to use a flat plane. Ideally I would've modeled some wrinkles into the cloth and actually given it a little bit of thickness.

Our second tutorial was to make a pear. I learned that not very many people know about red pears that since a lot of my classmates told me I was making it the wrong color or asked me if I was making an apple. So I'm just going to take a minute to say that Red pears are an actual thing and that they are delicious and everyone should try them!
 Anyways-for the pear, I did do the entire thing procedurally in Maya but still I deviated from the tutorial quite a bit. I'm pretty happy with it except for the stem, which I think takes a way from the rest of it. The focus was the body of the pear so I put most of my effort into that and just kind of threw the stem on at the end. I might fix it later but for the purposes of the assignment I decided not to worry too much about it.

I believe our next assignment is to do an entire still life, which I am extremely excited about. I've done so many observational drawings of a still life, but I've never really done one in 3D so it should be fun. I'll be sure to share on it once I have something for it started.

Tuesday, November 29, 2011

New Quarter

Sorry I haven't posted in a while. I'm inbetween changing classes and prepping my portfolio/fixing websites and so on. Unfortunately because of all of that I haven't had too much time to do any new work so I don't have too much to show. I'll be starting up my new 3D classes tomorrow which I am very excited about.
I'll be taking a class on 3D printing and Shading in Maya so I'll be sure to share the work I produce through out the quarter.

Once again I don't have too much to share for the moment, so here's an older peice that I've been working on every now and then in my free time.


Saturday, November 19, 2011

Finals Fiasco


I have returned! I know it's been quite a bit since my last post, but in my defense, I have yet to even nail down an official posting schedule. Either way, I'm here and I've got a lot to share.

When I last updated, I talked about some difficulties I ran into with my character project. Well if you haven't guessed already, the reason for my absence is exactly that. As it turns out things did not go as smoothly as I had hoped they would. 

I went through with my plan to step backwards on the jacket and retopologize it using 3D coat, unfortunately, when I brought the new topology into Maya and attempted to UV it, I found that I was unable to because Maya kept telling me I had more than one object selected. I have since attributed the issue to a bug with the auto-unwrap UV tool that can be found under the bonus tools. Unfortunately, at the time I had no idea what was causing it, and since I was running out of time on my final I decided to just bite the bullet and start over.

Quick note on the Bonus Tools : They are absolutely fantastic add-ons that users can get for free by signing up for Autodesk Area on the Autodesk website (Click Here For More Info). If you haven't looked into them, I highly recommend it! The Auto-Unwrap UV tool in the bonus tools is, in my opinion, 99.9% more effective than the auto-UV tool that comes built into Maya, and unlike the standard tool, it actually works! Aside from a few bugs (like the one I found) it's fantastic! I've found that it's far more effective than doing UVs by hand with planar, spherical, and cylindrical. It still might require some adjusting after wards, but it saves a lot of time.

That's when things started to go down hill. I restarted the jacket, almost from the very beginning. Except this time I was sure to UV it before taking it into Mudbox. I re-did the whole thing in Mudbox, and tried to take it back to Maya, but things where still just not working right. Bottom line, somewhere along the process I had my workflow messed up and I was running out of time for my final. At that point I had a little over 2 days left to UV and texture the whole thing, plus get the jacket figured out. 

It became pretty clear that as much as I wanted to learn these new modeling work flows, trying to figure them out right there and then was not an option. I had to fall back on my older methods and ended up recreating the jacket again for a second time, only this time, all of it had to be done in Maya. I managed to model in the folds without any issues (I've found that my drawing experience with cloth has really helped me when modeling it in Maya) but I had to take out his front pockets because I didn't have time to really add them in and make it look like they weren't rushed. I managed to get the jacket redone and everything UVed half way through the second to last day. I started texturing as soon as I could, and managed to pull off decent enough textures for my final. I even found time to add in hair while my ambient occlusions were rendering.

And here he is! Texture-wise, he is far from finished, and I have a long way to go. I did almost all of his textures by hand using Photoshop and some filter forge to generate the tile able cloth patterns.

Overall though, considering the obstacles I ran into at the last minute, I am very pleased with it. I think I have some great base textures going. I should be able to build off of this without too much difficulty.

I do want to mention that while the actual zipper is a texture, the material on his zipper pull is just the mea material default chrome shader and that I do not plan on keeping that. I will be replacing it with my own textures. 


Aside from that I'd really like to add more dirt and tears to his clothes. They look far too perfect and don't really fit in with the idea of him being an orphan. 

I hope to start working on him again very soon, but I also need to work on my portfolio overall this holiday break so it might be a little while until I can work on him again. 

Right now, I have to redirect my focus to fixing up my resume, putting together some turn tables, fixing up my portfolio site, and showing more of my process in my portfolio overall. Winter is when companies start accepting applications for internships, and I'd really like to get one for next summer if possible. I've spent the last two summers working for Bethesda Softworks as a QA Tester, and while I have enjoyed every minute of my time spent there, I really need to try to get an internship where I can do actual 3D work. Ideally I'd like to stay at Bethesda, but unfortunately they do not always have openings for 3D interns so I have to look elsewhere for the time being. 

With any luck, I'll get a decent portfolio together in time and hopefully land myself an internship. Keep your fingers crossed!


Wednesday, November 9, 2011

Making Mistakes and Moving Forward


It's been a few days since I've given an update on my project. The reason is because like anyone learning how to use a new program there are new workflows that need to be learned. And seeing as I am brand new to mudbox, I made one of the most basic mistakes in my workflow that has set me back a little bit. I forgot (queue dramatic music) to lay out my UVs prior to importing my stuff into mudbox! Which means I cannot bake out displacement maps to use on my lower poly versions of the models without having to start over. I could move forward with the mesh at it's higher level, but the amount of geometry is such that it would make UVing it jus as difficult and time consuming as starting over.
Luckily, there are a number of ways I can back track and solve this problem so all it not lost! I am planning on using a program called 3D Coat to help me re-topologize King's jacket and hat so that I can keep the details and have a more manageable mesh.

Normally a person would probably be very frustrated in this situation, but if I've learned anything from being in leadership positions in group projects, it's that staying calm at times like this is essential. Freaking out over a situation, no matter how far it might set you back will only set you back further. Panic not only prevents progress or rational thinking but it spreads very easily from one person to the next. So rather than panic, I've decided to look at the positive side of the situation.

First of which being that making this mistake early on during my introduction to Mudbox is likely to help keep me from repeating it later on. Not only that, but the fact that I am also forced to now find a solution to this problem will allow me to be better prepared in the event that it should happen again. I'll also be learning another useful program because of this. 

Overall, I think the set back is manageable and while I will be losing some time it will not damage or hurt the final outcome of the project in any way. Once I finish re-topolgizing the coat and hat I'll be ready to finish up the UVs and texture the character. I'll post some updated images as soon as I have some.

Saturday, November 5, 2011

Return of the King

And I'm back again! It's really because I just can't contain my excitement about my current 3D project. I worked on him again today, even though I told myself I'd get my other homework done first. Normally I would probably wait longer before posting new pictures of progress, but I feel like the changes I made today have made such a big difference that I couldn't wait to share.

Redid his face today. I decided to just do the whole thing over again because using Mudbox had made the mesh so high poly that it was difficult to effectively make any changes to it. What I did was make the old mesh live (making something live makes it so it's like a magnet and you can snap other things like vertices, objects, and so on to it) so that I could use the create polygon tool to redraw a lower poly mesh directly on it.

Having less polygons allowed me to quickly change around the face in Maya without having to do too much clean up after wards.It made it a lot easier to keep his face smooth and free of creases(visible pinches or lines on the surface of an object when smoothed). In the end I was able to fix up his eye sockets, which needed a lot of work and end up with a much cleaner looking model overall.

Straight on view of his old face. The nose was far more simplistic, which wasn't bad, but didn't really add anything to the model overall. There's some obvious issues with his eye lids as well, as they don't quite match up cleaning with his eye.


And here he is with his new face! I went ahead and made his nose more complex, but not too complex since he is supposed to be a cartoon. Having the new nose and eyes really adds to his character and in my opinion make his design so much stronger.

Only a few changes left to make before I can really start focusing on the textures again.

Friday, November 4, 2011

The King of Hoodlums

Hello! I'm back and surprisingly soon as well! I thought I should maybe try and time out my posts so that they aren't random, but I'm really just too excited about what I am currently working on to keep waiting to post about it.
Over the course of this quarter (RIT currently runs on the quarter system rather than the semester system) I have been developing this character for a game idea that I came up with. He started out as a doodle at first, but I got so attached to him that he ended up in two of my projects for school. 

  One of them was for a design doc for a video game that I ended up using this concept for since I had thought of it earlier in the quarter. The other is the final project for my Poly and Sub D class that I am currently still working on. 

 A quick bio on the character:
Name: King
Age: 10-11
Grade: He does not attend school, but if he did he would be in 5th grade
He's the leader of a gang of orphans known as the "hoodlums,” which includes him and at least four other children. He's a mischievous troublemaker, but he has generally honorable intentions. He is extremely loyal and does everything for his fellow Hoodlums which he sees as his family.

For the design doc I did this (top left) quick concept drawing of the character, which was okay for what I needed it for, but I really wanted to push it further. Once I found some time I revisited the image and added some red light to give it more of a dramatic feeling. 


It's still not quite at the point where I am ready to call it a finished picture, but since pushing this particular drawing further has become more of a side project it's something that has to wait until I can find time before I can work on it.


The Crown and the number "5" in the top right corner is his trademark and are actually painted on to the back of his jacket. They're just a prototype for the time being, and I intend on cleaning them up since they look more like they are dripping with blood rather than paint. 

For Poly and Sub D I have been working on modeling him. Here are some thumbnails of the different points of progress I had. He’s come a long way, but I'm still not quite done yet. I'm about 95% done with the model and am about to start texturing him. 

For the model I blocked him out in Autodesk Maya and refined the shapes. I took his face, jacket, and hat into Autodesk Mudbox to model in the wrinkles and folds. I contemplated doing the same thing for his pants, socks, and scarf, but I found that because i could easily add in edge loops and then use the slide edge tool to manipulate them that I had an easier time modeling them in Maya. 

I think that in most cases it may be easier for people to model them in Mudbox, but I am fairly new to it and find that I am somewhat messy at it. So when It came to spending a few hours in Mudbox trying to add in wrinkles and then having to fix them as opposed to one or two hours in Maya, i decided for now I wanted to go with what I was more comfortable with.

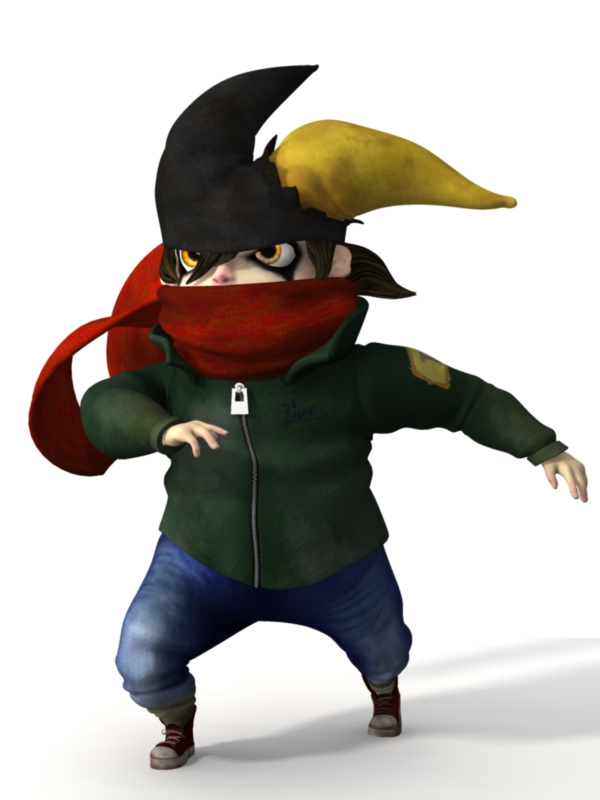
Here's what I have currently:

All of the modeling is done except his hands, the tails of his scarf, shoe laces for his left shoe, and his face which needs to be adjusted.
I made a quick texture for his jacket using Filter Forge. I will be making it much dirtier later on, but I wanted to test the base texture out so I threw a quick automatic map on him to see what it would look like. Once I UV him properly, I am going to take him into Mudbox and add some more details using displacement maps and normal maps, as well as possibly texture him in Mudbox using textures I make in Photoshop or Filter Forge. Once his model and textures are done I am going to redo the lighting and set him up for rendering and then try and add in hair. I tested hair out on him earlier which worked well I just haven't played around with the settings yet. 

Before I go, I want to ask if anyone has any characters over their own that they'd like to share or even characters in a TV show or comic that they particularly like. Leave comment and tell me about them. Who are they? What are they like? What do you like/hate about them?